Thursday 7 June 2018

SIMPLICITY 1069 CULOTTES / you look radiant!

Hello! Back again! This time with a garment that scores such high compliment ratings, I recommend you all go and make one forthwith!


The item in question is a pair of cropped-length culottes, sewn from view B of Simplicity 1069. I can't remember where I first came across this pattern, but it was love at first sight: the shapes in the pictures caught my eye, and then I realised it was a multi-garment pattern consisting of both culottes and wrap skirts, and was immediately smitten. Two items at once so similar and so different, both of which I'd been wanting to make for a very long while - whenever it was, this pattern hit me at just the right time, as I had neither thing in either my wardrobe or my pattern library. I had to have it!

And then of course I didn't actually do anything with it for over a year. (In fact, it might even have been two).


When I did finally open the pattern envelope, I discovered that the first page of the instructions was missing, so I didn't have any of the diagrams or general info, just the text - in Spanish. Fortunately I've sewn enough pairs of trousers to not need a great deal of info, and just googled the relevant vocab to check which way to press the pleats and suchlike. Also of great help is that there are only 4 pattern pieces: front, back, and front+back facings. It was traced and cut in no time!


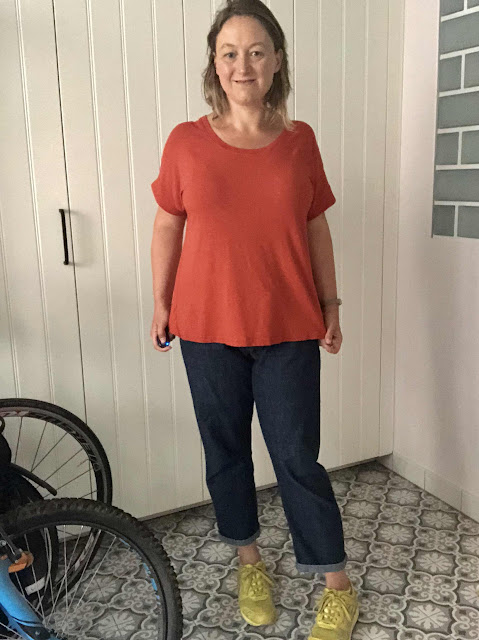
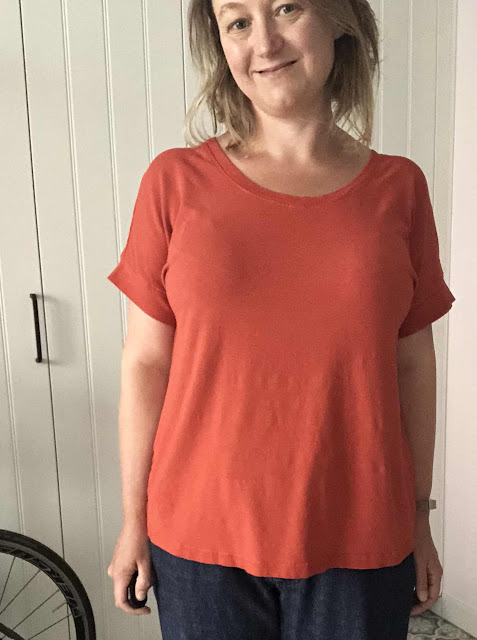
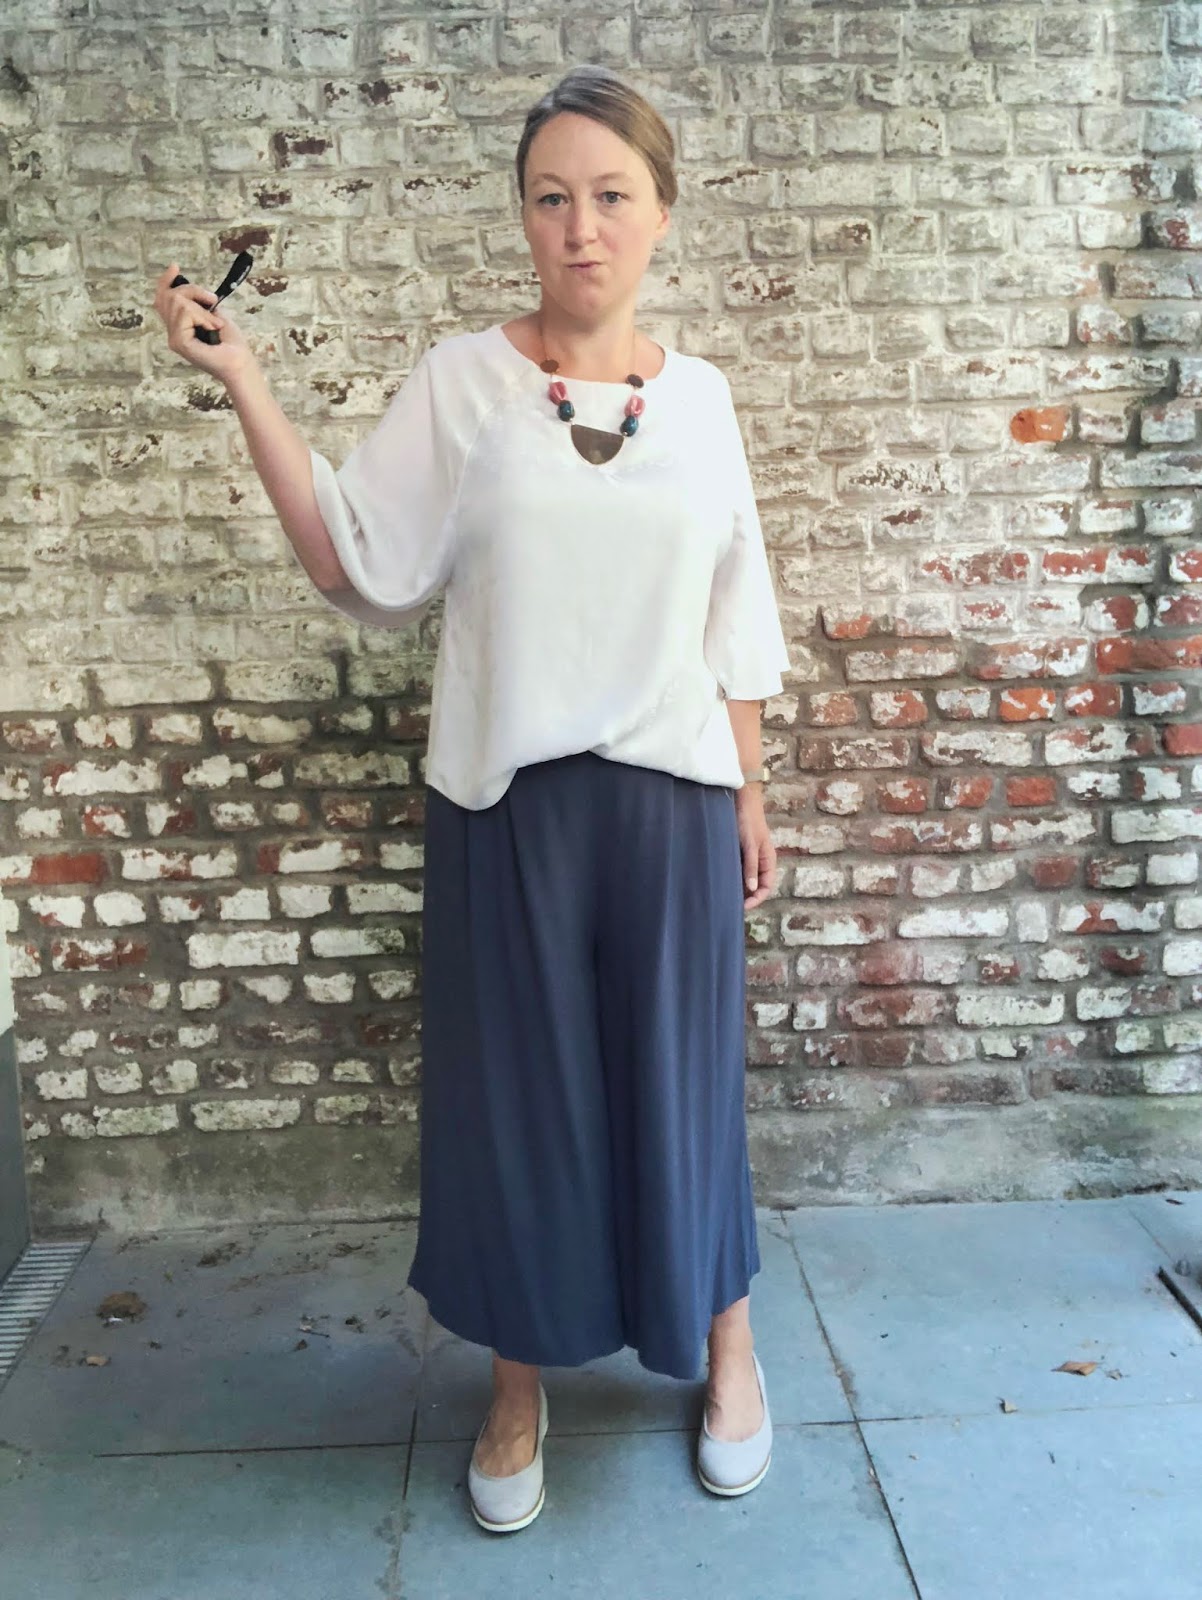
Cutting was a pain, though. As you can hopefully tell from this marvellous pose, my fabric is a lovely drapy crepe (probably a polyester-rayon mix: inexpensive but prone to creasing) which shifted all over the place during the making process. But thanks to the minimal pattern pieces, it was manageable - and upon completion I forgave it instantly anwyay, because let me tell you: THIS FABRIC IS LUSH. It hangs beautifully without clinging anywhere, just swishes around in a cool and luxurious manner - these culottes are an absolute delight to wear, and I would probably do so whether they were flattering or not.

However, it seems they really are! I wore this exact outfit to work yesterday and had two people tell me how fab my trousers were, three people telling me I looked "radiant" (!!) and, one, well ok it was more of a backhanded compliment, but I'll take it: "Jo! You look great! Different somehow... really quite... chic!"  Er, thanks? Yes probably quite different from usual, indeed.

Personally, I think it's all down to that shape that grabbed me in the first place. These trousers are wide and pleated and culotte-ish in perfect balance. There is no bulk where it's not needed, but just the right amount of fabric to skim down from the waist into those deliciously wide (but not too wide!) legs. I mean, look at those lovely pleats:


And the back view is not bad either. Having learned from previous trouser-sewing experiments, I carried out a flat seat adjustment on these, which I think makes a good deal of difference - if there was too much more fabric there, the back legs wouldn't drape nearly as nicely. Small things, but important! The method I used was from this book, which I find absolutely invaluable. Often the methods it describes are different - and frequently simpler - than most tutorials online, and in fact I wanted to link to a version of how I did it for this post, but couldn't find one. So, if there's any interest in a quick tutorial for an easy flat bum adjustment, let me know and I'll post it :-)


The main thing to note about the fit of this pattern is that, as we have come to expect from the Big 4 pattern companies, it comes up large where it should be more fitted. I chose my size based on my waist and hip measurements, and it's not far off being just right - but the pattern does explicitly state that:
  1. the culottes are designed to sit 1" above the natural waist, and;
  2. the finished waist measurement has 1" ease above the actual body measurement.

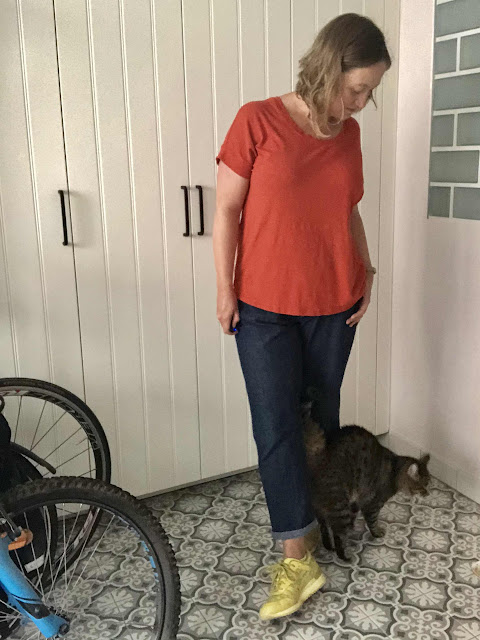
But as one can clearly see here, these neither reach my natural waist, let alone 1" higher, because there is a lot more than 1" ease.


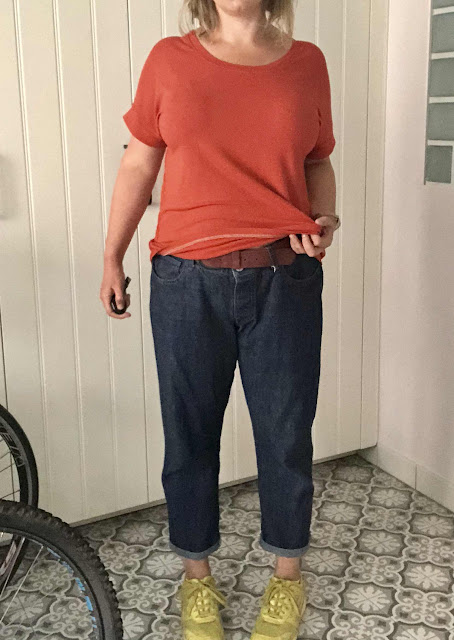
These didn't turn out a lot too big, but big enough to not be wearable, because they just wouldn't stay put. Time for some ninja fixing skills. While I had been quite looking forward to wearing proper trousers with a zip for once (y'know, like a grown-up), resorting to elastic AS USUAL was the obvious remedy. (I realise now that I haven't blogged all the trousers I usually wear, but yes, elastic waists everywhere).

So, I made an elastic casing by topstitching the trousers to the facing at 2cm below the waistline, leaving gaps of +/- 3cm either side of the centre-back zip. I then fed my elastic through and secured it to the zip seam allowance on either side to hold it in place, stitched the gaps closed, and that was it. Waist brought in nicely! And I actually think the resulting trousers are better this way than if they had fit properly to begin with - they're certainly more comfortable, but because the elastic is only a few cm longer than the waistband itself, there's no bunching or gathering - they still hang as smoothly as if they were properly, more closely fitted. WIN!

Yes, I like them very much.


Not that you can tell from my facial expressions, but we've already established that I'm giving up on those.


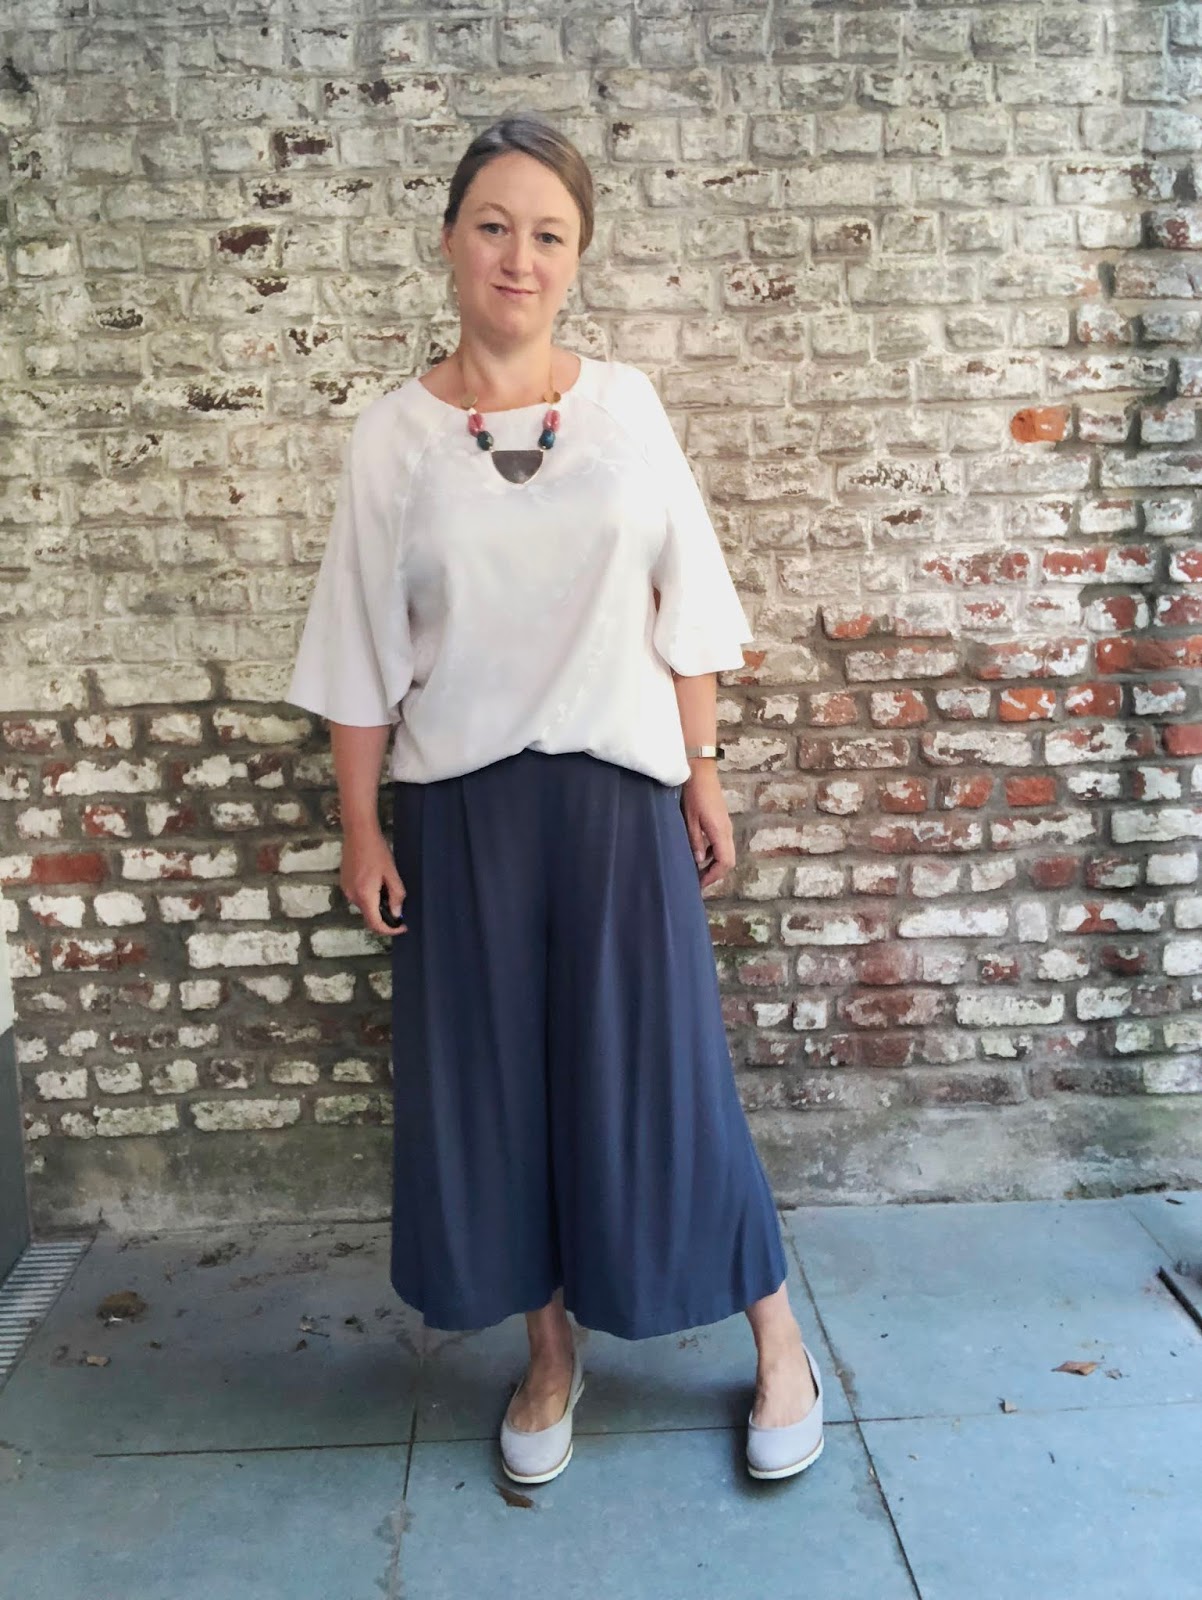
These pictures are just me swishing and swooshing my culottes around, hoping you can tell how fab they are.


Make no mistake: these culottes are fab. Go sew yourselves some, you radiant people!


Follow

Saturday 2 June 2018

MORGAN JEANS + GRECO TEE / plain and simple

OK so having gone on about how great the iphone camera is, I'm not sure what happened to make these pics come out all grainy - but I'm not re-doing them! And actually, I think that's entirely appropriate to the makes themselves: low-key, laid-back - basically, clothes for lazy days off.  In keeping with the whole theme, here you also have me posing without even having blow dried or tied up my hair*.  Today we are doing the very casualest possible, thank you very much!

* and, it turned out, with the onset of my very first migraine. Ugh.


So let's start wth the jeans, shall we? These are a pair of Morgan jeans that I made two years ago. At the time, this was a big deal - they were the first pair of jeans I had ever made, in fact the first pair of trousers that weren't stretchy Hudson pants (I think). So there was quite a bit of nervousness about the both the fitting and the sewing processes being more involved than I was used to.

(By the way: yes, still struggling to coordinate photo-taking posture with photo-appropriate face. No longer struggling with whether to care, I shall just post them anyway.  You'll be able tell when I've lost all remaining self consciousness, when I stop even mentioning it...)


Of course by now you've probably read approx 1 zillion blog posts about the greatness of  Closet Case patterns' jeans-sewing instructions, and yes, I was pleasantly surprised to find that sewing jeans wasn't/isn't difficult (even allowing for sewing machine uncooperativeness when it comes to buttonholes). As many others before me have found, it was even rather enjoyable, especially because at the end one has MADE ONE'S OWN JEANS!! So as far as the sewing process was concerned, no problem.

On the fit, however, I stumbled slightly. I wasn't so lazy as to avoid making a muslin, but I was lazy enough to not bother attaching the waistband to it before deciding on my adjustments.... and I also didn't factor in that my denim had considerably more give than the upholstery fabric I muslined with.  With the first wear of the final jeans, it became abundantly clear that not only could/should I have gone down a size, but also that I really didn't need to faff around shortening the front crotch. At all. See those drag lines?


And that's with me wearing these jeans as low-slung as possible.  Even then, the waistband is all bunched up under my belt. Plus, that's a hell of a lot of extra fabric in the bum area too:


I've since come to the realisation that I tend to need a flat butt adjustment on most trouser patterns - but I also think that for the non-stretch Morgan jeans, sizing down and allowing the fabric to bag out a bit with wear is definitely the way to go.

In real life though, where for better or worse no-one tends to be looking that closely at either my front or back crotch, it's hardly a disaster. I have been wearing these jeans solidly for the last two summers and it's fine, even if they can't really be paired with tees any shorter than this, for the sake of covering up the fit issues.  The denim isn't super heavy, so they're ideal trousers for mid-temperature weather, and at time of making, it was a real relief to switch back to non-skinny jeans again. Plus I love the cropped length and look of them with the turn-ups. So, yay for Morgan jeans! I did immediately make another pair in linen, actually - but they just came out of the wash and need ironing, and I wasn't going to do that just for blog photos, so you'll just have to imagine them. They're grey and the fabric came from Ikea. They have the same fit issues but worse, because linen.


Anyway, on to the t-shirt!!  I think we can all agree that the ideal t-shirt pattern is an elusive beast, essentially because we would never be able to agree on what the ideal t-shirt pattern actually is. Everyone's ideal tee looks different. However, this one comes pretty close to mine - and, bonus points because it's FREE!

This is the Greco tee by Ensemble patterns. As you can see, it's a loose-fitting scoop neck t-shirt. The pattern comes with a couple of options - straight or curved hem, short or cuffed sleeves. I went for the curved hem and cuffed sleeves. The pattern notes mention that you can get different effects using different types of fabric - the less drapy your fabric, the boxier your tee - and in fact I made three of these t-shirts in three cotton jerseys with varying lycra content. This orange one is the drapiest and stretchiest, and has turned out to be my favourite to wear (plus, ORANGE). The others are a shade too boxy for me (something I never thought I'd say!), even though neither of the fabrics are particularly stiff. Perhaps sizing down for a slightly closer fit in less stretchy fabrics would be a good idea. Anyway, overall the proportions of the Greco are exactly what I want from a t-shirt. I don't have much else to say about it than that! I hadn't come across any other t-shirt patterns that quite fit the bill, so this one plugged a gap there perfectly.


Another good thing: the pattern pdf is available in A0 format as well as A4, so I splashed out and had my local printshop print it for me. I usually don't, as they charge 6.50 euros per A0 sheet, but this pattern is all on one page and I figured I could handle the cost this once, given that I hadn't paid anything for the pattern itself. These days I'm increasingly feeling that life/time is just too short to spend it sticking together patterns tiled on A4, and will just choose printed patterns wherever I can. But there are still plenty of patterns available in pdf format only, and at that price, having the local printshop do it isn't really a permanent option. So I've been extremely pleased to recently have discovered Patternsy - who will print large format pdfs, or even tile A4s together if you're prepared to pay a bit more, on excellent quality "heavy" tissue paper, and ship it to you at top speed at exceptionally reasonable prices (even factoring in shipping to Europe; they're based in the UK). Given that pdf-only patterns are usually slightly cheaper than paper patterns, the total cost of having Patternsy do my printing doesn't usually come to more than I'd have been prepared to pay for a paper pattern in the first place. All round win!


Right, so, there we are. I think I've said all that I possibly can about this most basic of outfits, and almost certainly more than was strictly necessary :-)


Byeeeee!


Follow

Saturday 19 May 2018

GREEN LINEN ARCHER / blog comeback?

Yo guys! I'm back! Here's a shirt I made! 


This is my second Archer shirt - in fact, I think it's the second button-up, collared shirt I've made myself ever. The first was ages ago when Archer shirts were a new and exciting thing and the whole blogworld was making them and I thought I'd join in even though I hadn't worn a shirt for about 20 years, and the ones worn 20 years previously had basically encapsulated everything that was awful about dressing oneself as a teenager in the 1990s. Needless to say, although I liked my first Archer very much in theory, it didn't actually get a lot of wear. I suspect the plaid flannel was a bit too close to teenage-me for comfort.


This one comes from a different place. A place where Archer shirts have been around for yonks and are actually a bit boring in blogging terms these days I suspect (but you're still reading this, right, so we're good?) I am now also slightly less influenceable by what all the cool kids on instagram are making, or at least, less immediately so (I'll have been lurking whatever the algorithm shows me for quite a while before I finally give in and buy that hot new pattern from 6 months ago).  So when I found myself needing long-sleeved, lightweight shirts to take on holiday to Jordan over Easter this year, I found myself thinking: hey, I already have a great pattern for that! And promptly went shopping for linen.  

This rather lovely forest-green stuff comes from Berger, my reliable go-to source of solid basics. It was 7.5 euros a meter, which is a pretty good price for a perfectly good linen, I think. It was a bit stiff to begin with, and softened up a little in the pre-wash - but it was on washing the finished shirt that it really started to "break in" and it's just been getting softer and lusher ever since. To the point that I have been falling steadily more in love with this shirt every time I wash it.  I really love it!  It has no 1990s overtones at all - in fact, I'm greatly enjoying the rather 70s vibes it gives off, aided dramatically by pairing it with some deliciously high-waisted and wide-legged jeans I got recently in H&M, which I probably do more than I should. (I don't care).

Other construction stuff: it's view A without the butt ruffle, I did my usual no-dart FBA, lengthened the shirt body by 6cm and shortened the sleeves by 2. I followed the pattern directions but found myself wishing I had used Marilla Walker's method for attaching and finishing the collar, as detailed in her Isca dress pattern - which by the way I must also tell you about sometime soon, I love that dress - because I found it more straightforward in getting a nice tidy finish. Right now unfortunately I can't remember the difference except that I found Marilla's version way less fiddly when closing up all the seams, but if I go away to look it up this post will never get published.

Also, while we're on technical details, I just got a remote for my phone camera, having swapped to an iphone after years on android, and these two things combined mean that taking pictures for potential blog posts is now WAY easier because a) I always have my phone to hand, b)  the iphone camera is shit hot so the pics don't really need editing, and c) I can therefore just upload them when I'm on the metro or whatever. So who knows, maybe I will actually tell you about that Isca dress sometime soon.

Nonetheless, making appropriate faces for blog pictures remains a challenge.


Anyway, as is the way with holiday sewing, I finished making this the evening before departure, except that I hadn't done the buttonholes. I tremendously dislike buttonholes, not because I am afraid of them but because, despite all the sweet talking, cajoling and downright bullying I have thrown at it over the years, my sewing machine remains a bitch that refuses to sew a functional buttonhole if it can so much as smell an adjacent seam allowance, no matter how trimmed or graded.  But then I had a brainwave: somewhere like Amman would of course have tailors, who could sew them on the spot. I texted my sister (who lives there, and who hosted and holidayed with us) to confirm my hunch - and went to sleep having happily avoided an obsessive pre-flight sewing all-nighter.

Two days later, we found the downtown tailoring district easily enough, located a man available right then, and proceeded to have the following conversation.

Me : it just needs buttonholes where I've marked with the pins.
Sister and tailor : discuss in Arabic
Sister to me : is it a man's shirt or a woman's shirt?
Me : it's for me.
More discussion
Sister : he says it's wrong.
Me : I know, that's because I sewed the placket on the wrong side by accident.
Sister : what's a placket? 
Me : ... explains...
* Sister and tailor : more discussion, rather intense
Sister : it doesn't make sense.
Me : but I don't actually care which side the buttonholes are on anyway.
Repeat from * about 4 or 5 times
Me : ok tell him it's a man's shirt.
Sister : tells him it's a man's shirt
Tailor : rolls eyes, tells us to come back in an hour
Sister and me : leave, feeling a bit sheepish

Needless to say, this shirt has the best buttonholes of any garment I have ever made, and probably of any garment I will ever make in the future too. Now I want an industrial sewing machine that can be relied upon to power through all the seams in all the things at top speed, but the husband is sadly not on board, mainly because this would involve either an extra item of furniture, or cutting a hole in one we already possess. Spoilsport.


This picture ^^ didn't really come out as intended, but is essentially the exact image of myself I have at work when adding people to my daily list of fools, as in, I don't suffer them gladly.  I am totally super-professional though so I answer all the stupid questions with enthusiastically cheery politeness, and then when I hang up I do that pose in my head.

Anyway guys. Make an Archer! In linen! They're so good! Not news to anyone anywhere, I know.  So my main tip for this post is: GO TO JORDAN.  I cannot even begin to describe what a great place it is to visit, so I won't even try, but seriously. Do it! 

Hasta pronto, my lovelies!


SaveSaveSaveSave
SaveSave
SaveSave
Follow

Monday 24 July 2017

Ease into motherhood: Find Your Voice

  
Ease In to Motherhood is a sewists’ celebration of motherhood and the changes it brings to our lives. During the month of July, we invite you to share your experiences of the physical and mental changes of pregnancy, childbirth and/or any other way a child comes to your life. We invite you to share how you embrace yourself throughout motherhood, to appreciate all the physical and mental energy it takes, to accept and love the changes in your body, your mind and your life. We invite you to share how you still dedicate time to care for yourself. We invite you to share how sewing is a part of your life through the journey.

(A discussion opened and hosted by Erin, Jodi and Montserratt).


*  *  *

OK so I know it's a nice little play on sewing words, but I must admit that my very first thought was: um, ease into motherhood? HAHAHAHAHAHA. CRASH, more like it!

Or was that just me?

Two pics of each - I most definitely do not have four children

The thing was, though, I loved having tiny babies. I know for some (most?) people, the early months of constant feeding, nappy-changing and interrupted sleep are a tortuous experience which improves dramatically as the child gets bigger. But I found the newborn phase relatively easy - breastfeeding went fine, the first child was a good sleeper, and while the second wasn't, I was enjoying myself so much that I breezed through his first six months fuelled on a mix of euphoria and strong coffee.  Perhaps that's why the crash, when it came, was all the harder.  I'd thought I was doing just fine. And no, I didn't much like the weaning and toddling, but this too was a phase they'd grow into and then out of. I didn't think I had anything much to worry about.

I stopped breastfeeding my son (the second of the two) quite suddenly when he was six months old. I had been enjoying pottering along on maternity leave and sort of forgot I was going back to work, and would therefore need to getting him drinking out of bottles for his time in daycare, until the week before. He took to it immediately, and the physical relief of not feeding him myself every two hours was so huge that within that week I transitioned him to being entirely bottle fed. Feeding issues for creche: sorted. Me: liberated. I hardly gave it a second thought.

I should have. Eight years later, I am now quite firmly convinced (on no scientific basis whatsoever I must add) that that sudden hormonal, physical and emotional change was what flipped the switch in my brain somewhere and kicked off my journey into depression. I've talked about that experience here, and luckily, not much has changed since then (the meds and mindfulness do their job!) What I do have now, though, that I didn't fully realise at that time, is an awareness of just how much my struggle with depression and anxiety is and has been a struggle with the fact that I am a mother.

That's a hard thing to face. I'm not even sure I could say why it is (I could offer a few theories, but they're probably best kept for the therapist). But it recurs over, and over, and over again - almost any anxiety or stress I experience, however it presents itself to begin with, only gets resolved when I trace it back to the same question: who am I? I'm a mother. And what kind of mother am I? And what else am I? And who are these children, and how do we grow together? And that's where the process of working it out, picking myself up again, starts.


Left: bought the fabric without thinking of the ironing those sodding ruffles would need.
Centre: towels + bias tape. Seemed like a good idea at the time. Worn once only.
Right: the first trousers I ever made. A rare early success!


So, motherhood and sewing. Well, I completely agree with everything Vicki wrote here about Getting Yourself A Thing. Obviously, sewing is my Thing too, and I'm very glad I found it. Also my Things are blogging, and instagramming, and twitting (less frequently these days) about sewing.  Being able to communicate with others about the Thing does me a power of good! And if I have anything to say to other parents reading this, I suppose it's on that. Find Your Thing, yes, but also:  Find Your Voice.

I had another blog before I started this one. It only lasted a few months before I shut it down, and the reason I did that wasn't because no-one read it (though they didn't) but because it wasn't my voice that was coming out.  Instead, it was the voice of someone who thought that blogging about sewing was somehow the same thing as blogging about your children, and about sewing and crafting for them and with them. You see, there were so many wonderful sewing sites and tutorials out there - Dana, Sew Mama Sew, to name just two - and I simply didn't know where the not-mummy things were. In my real voice, now, I can tell you this: I hate crafting with children. I'm SO glad mine are big enough now to do their own crafts without very much parental input. But back then, when they were small, that blog started like this...

*  *  *
Wednesday, February 9, 2011
First post


This is my idea of a good time: at home pottering about and making a merry old mess. Them: toys, crayons and books. Me: pins, needle and thread.

I learned to sew with my mum and at a rather traditional girls’ school where I and 5 others took GCSE textiles. In my rose-tinted memory the class was a twice-weekly haven of calm, creativity and gossip; my mum mainly remembers the enormous practical coursework burden and desperate all-nighters trying to finish the projects.  These were clearly enough to put me off, because I hardly sewed anything for the next 15 years or so.

And then last summer I got my stitching mojo back. I rediscovered my sewing machine (a secondhand 1970s model that cost 20 pounds and weighs about the same), experimented with some easy dresses, and then threw myself into making Christmas presents for my friends. Since September I’ve spent more lunchbreaks than I care to admit on fabric porn*.

Even at its most frustrating, sewing is total occupational therapy. It’s absorbing and it's liberating, keeping my hands busy and clearing my head. I find myself actually thinking about things again (with two toddlers and a full time job, it's been a while since I did that).  So this blog is mainly about keeping a record of the things I’ve made - but it’s also about getting myself to keep sewing and thinking. Because another thing I really enjoy but don’t do any more is writing.

The idea is that making stuff and writing about it keeps me more or less sane...

* i.e., wandering around fabric shops, stroking things and trying not to drool.

*  *  *

It's clearly me in that post, and I still hold to most of it. But you know what? In reality, I hate mess. And nice though it was to sew in the middle of family life, generally I find it even nicer to sew in my own room, preferably with the door shut and an audiobook on. In that post, the kids get mentioned first, then I appear briefly before moving on to my own mother, who pops up straight away in the second paragraph (analyse that...). That idea I had about "keeping myself sane" - I suspect what I meant was "keeping" (or rather, "making") myself the kind of mum who blogs lovely things about her children on the internet. It is me in that post - but it also really, really isn't.

The only kind of parent any of us can be is an authentic one.  Nobody else can parent your kids the way you do (and that's a good thing!); no-one else can speak to your experience.  You might be the parent, like me, whose only choice is to embrace the fact that motherhood and identity are sands constantly shifting beneath your feet. That's ok. We're ok. Our kids are ok. It's who we are. The only stories we can tell are our own; and we are the only ones who can tell them.

You just need to Find Your Voice.

(It's the one that's been there all along).


Follow

Wednesday 19 July 2017

Back at it

Yesssss the scissors are out again!!


One dress-length fluorescent striped Sutton blouse hack, coming right up!

In other news, knitting.

I'll spare you the story of why there is a sofa in front of the door to the garden.

I started the sweater - in fact I liked starting it so much, I did it about 4 times until I got a gauge I was happy with. 


It starts with a neckline welt, which reminded me how much I love provisional cast ons. Such a clever thing! You know what else I love? That on Ravelry, you can use "provisional cast on" as a pattern search criteria. (Yes I know that should be 'criterion' but it just sounds weird). On Ravelry you can use almost anything as as a search criterion (ok fine, inner grammer nazi). You want free patterns for socks knit sideways with a provisional cast on in Estonian, sorted in order of hotness? Take your pick.


Also this week, I blocked a cowl and maxed out my credit card paying the security deposit for a motorhome rental. The next time I tried to order some yarn - and it wasn't even much, less than 20 euros!! - my payment was refused. NOOOOOOOOOO.  Holidays are all well and good, as is budgeting properly, I suppose. But GAH. A pattern pdf here and there never broke the bank - however a month without paypal might just break ME. 

On which I shall leave you, contemplating just exactly what that says about the health of my online purchasing habits #ugh


Follow